If you haven't come in contact with the Bestop Trektop Pro, seriously, you don't know what you're missing. It is the most versatile top on the market for the JK Wranglers. Forget swapping a hard top off and on your Jeep. Forget swapping your hardtop off in summer, and then putting it back on for old man winter. Why not put a new top on your Jeep and just leave it on? The Bestop Trektop Pro, once installed, gives you all the benefits and more of driving with a hardtop OR a softop. All under one roof. You just have to get one on your Jeep. Ah, but then, that's the tricky part, isn't it?
Installing a Bestop Trektop Pro Soft Top On Your Jeep Wrangler

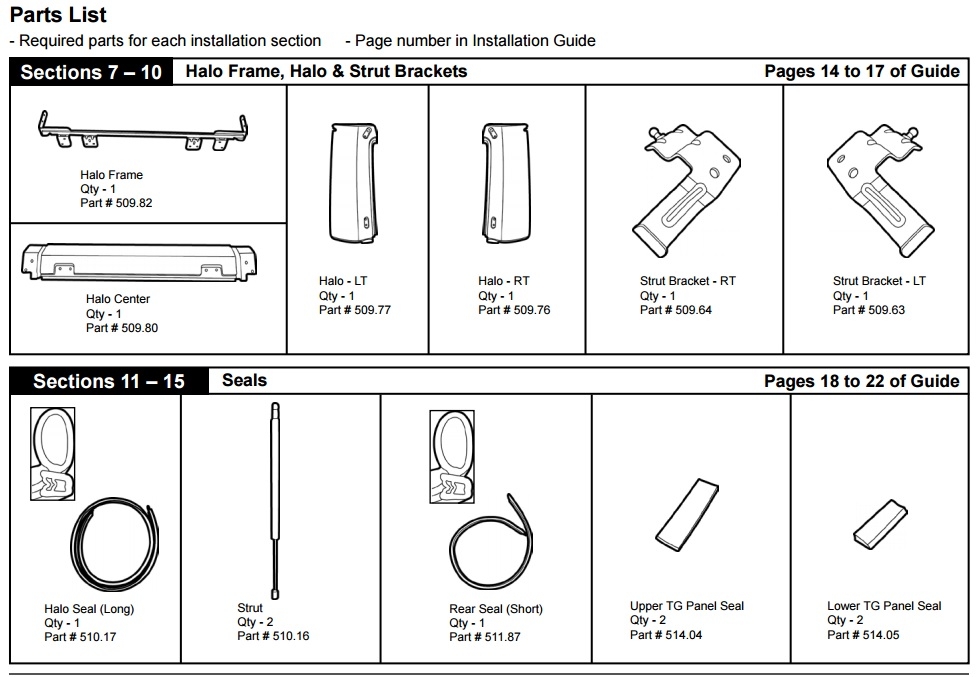
Let's look at the basics. Bestop says it takes about 4 hours to install this soft top on your Wrangler. That's not really surprising, since it's precision made, and it's designed to fit tight, flush, and correctly. It's not a 'one part fits all' kind of accessory. Roughly, there are about 42+ parts, not including the small hardware. Hey, you like puzzles, right? Just kidding. Bestop says the installation Skill Level to install the soft top is a 3. We're not 100% sure, we think that might mean you need 3 of your Jeep buddies to help (that's how we roll). No, just kidding again. A level 3 is on a 1 to 4 scale and is "moderately difficult," but don't worry, if you follow these directions it's not that difficult and you just need patience. Tools are simple: Phillips screwdriver, utility knife, ratchet, 13mm socket, open end wrench, allen wrench and safety glasses. Sounds simple, doesn't it? You should have all those tools in your garage easily (if you don't , borrow your sister's).
Starting with the Soft Top video
The first thing to do is see the Bestop video on how to install the top. This will give you a general idea of what goes where, and how they work together (we've put that at the top for you). Second, check all the parts in your Bestop box, and match them up with the directions parts list (Misplaced the directions? Simply download the Bestop Trektop Pro PDF here). You don't want to get halfway through the installation and find out something is missing. That's not good.
 Once you have your tools ready, it's a matter of bolting up the various parts and brackets. The great thing is, no drilling is involved. When bolting on the brackets and hardware, you'll really appreciate all the engineering that went into this top. It's quite amazing how it uses existing holes and notches, and that it can all be assembled by hand. No welding, no fabricating, no duct tape. You're just using various parts to assemble the sturdy frame, on which the rest of the top attaches too. Door surrounds are included so that your existing doors will seal flush and give you a good seal (new rubber seals are provided for the doors and the rear window).
 Bestop Sunrider Feature
Since the top has a Sunrider feature, where you can open up the front of the top for some fresh mountain air, you can make the change in seconds by hand (without tools). Attached to the rear of the frame is a halo support that allows the rear window to flip open. So you can get fresh air now in the front and back. The window section seems to be the most complicated of the assembly, only because it's a moving part. It's also important to have it properly aligned, and there are plenty of slotted holes and adjustments that can be made to get a good fit. With new seals (that Bestop includes), it's unlikely you'll have any issues over the years (it's recommended that you have a Jeep friend help you install the rear window. It's tempered glass, and you can only drop it once, so help is a good thing!). Gas lift supports hold the window in the open position, so you don't have to prop it up or anything like that once installed. By the time you get to the top arches and bows for support, you're almost about half way. Those will keep the top tight and help it retain it's shape for years to come. A few parts are attached to allow the Bestop Sunrider feature to work.
One great thing about the Bestop Trektop Pro is the removable rear side windows. In fact, they can be removed and put back on WITHOUT ANY TOOLS in just a couple of minutes. This is a handy option for the rear passengers to get more air on those frequent trail runs (BONUS: the rear window also can be removed easily!). After you have the frame on, the rear window, side windows and such, and all the various brackets and smaller pieces, it's time to get the twill fabric on. The back half uses straps and retainers. This is all primarily done easily by hand. Once that's accomplished, it's on to the front to use the Sunrider portion to line up the top in front. Flip closed the Sunrider and hook the latches. Around this point, you get to stand back and check out your work (after any minor adjustments of course) We imagine it looks pretty good on your Jeep!
 At it's heart, it's a soft top. But has the same features, and a few extra ones, that a normal hardtop will have. Except on a hard top, you don't get a Sunrider, and you won't be popping out the back windows or rear glass. This isn't a step by step installation list here per se' (the PDF actually does that) and with the video, you'll see just about anyone can install the top. With a few Jeep buddies, we think you could probably do it in less than the four hours that Bestop mentions. Either way, once you install a Bestop Trektop Pro, all your Jeep friends will want one too. Plan on helping them install theirs! PS: you may have been able to tell, our JK Wrangler Giveaway Jeep has a Bestop Trektop Pro installed on it.